Table of Contents
ToggleA dummy security camera won’t catch a burglar in the act, but it might stop one before they try. These fake surveillance devices look convincingly real and cost a fraction of actual security systems, typically $20 to $50 each, making them a popular first line of deterrence for homeowners on a tight budget. In 2026, as home break-ins continue and DIY security becomes more common, many homeowners are combining dummy cameras with other affordable deterrents or real systems to create layered protection. This guide walks you through what dummy security cameras actually do, when they make sense, and how to install them for maximum effect.
Key Takeaways
- Dummy security cameras are affordable deterrents costing $20–$60 each that deter opportunistic burglars through visible presence rather than actual recording capability.
- Effective dummy camera placement requires mounting at entry points (front door, back door, side gates) at 7–9 feet high with professional-looking brackets and hardware to maximize credibility.
- A hybrid security strategy combining 2–3 real cameras in less obvious spots with 4–5 dummy security cameras at high-visibility entry points provides both deterrence and actual evidence at a fraction of full-system costs.
- Dummy cameras work best in moderate to low-crime neighborhoods where visual deterrence is sufficient, but high-crime areas warrant investment in real systems with actual recording and monitoring capabilities.
- Realistic dummy cameras should include LED indicators, weatherproof construction (IP65 or higher), and proportions matching genuine models to avoid appearing fake to potential intruders.
What Are Dummy Security Cameras and Why Homeowners Are Using Them
A dummy security camera is a realistic-looking plastic shell built to mimic the appearance of a working surveillance device. Inside, there’s usually nothing but empty space, no sensor, no recorder, no live feed. Some higher-end fakes include a blinking LED light (powered by a battery or solar cell) that creates the illusion of an active system. They’re not meant to fool law enforcement after a crime: they’re designed to discourage criminals from even attempting a break-in.
Homeowners reach for dummy cameras for one simple reason: deterrence costs almost nothing upfront. A working security camera system with monitoring can run $500 to $2,000 or more annually. A dummy camera, placed visibly at an entry point, broadcasts the message that the home is protected without the expense. Some mount them at corners where they’re highly visible, others pair them with actual cameras in less obvious spots to create the illusion of full coverage.
The psychology is straightforward. Most residential burglaries are crimes of opportunity, thieves scan neighborhoods looking for easy targets. A house with visible security equipment, real or fake, typically gets passed over in favor of one without it. Research from the Lorex Smart Home Security Center and similar sources shows that visible deterrents, cameras, alarm signs, motion lights, rank high on lists of factors that cause criminals to move on.
Key Benefits of Installing Fake Security Cameras
The appeal of dummy cameras boils down to a few clear advantages:
Affordability is the headline. You’re spending $20 to $60 per camera instead of $200 to $500 for a real one with quality optics and recording capability. That price difference means you can cover more ground and place decoys at multiple entry points, front door, back patio, side yard, garage.
Installation is instant. No power runs, no Wi-Fi configuration, no monthly subscription. Mount the dummy with two screws or adhesive strips, point it at a likely entry route, and you’re done. The job takes minutes, not hours. You don’t need an electrician, and you don’t need to run cables through walls or set up a cloud account.
Low maintenance follows naturally. There’s no battery replacement cycle on many solar-powered models, no firmware updates, no footage to review or storage plans to manage. If a dummy camera gets dusty or weathered, you clean it or swap it out.
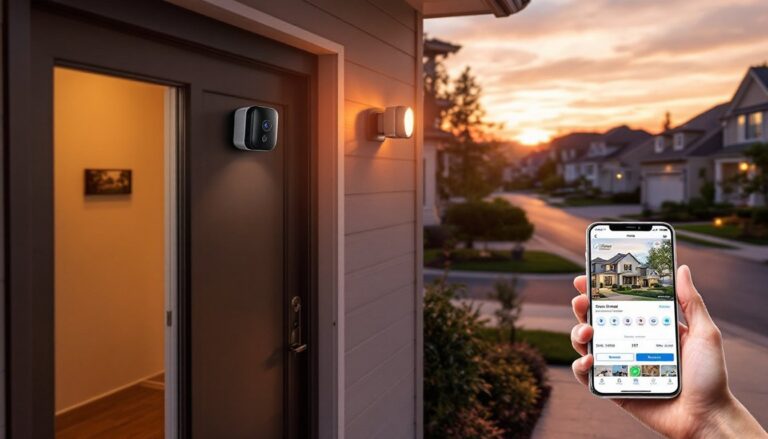
Flexible strategy is less obvious but valuable. Many homeowners use dummies as a visible perimeter defense while placing one or two real cameras in less obvious spots where they actually record. Thieves see cameras everywhere and assume full coverage. The real system captures evidence if someone does attempt entry, while the visible decoys (and real cameras they spot) reduce the likelihood of that attempt in the first place.
Notes on effectiveness: Dummy cameras work best in neighborhoods with moderate to low crime, where visual deterrence is often enough. In high-crime areas, real systems are worth the investment. Build codes and zoning laws don’t regulate dummy cameras, so you won’t need permits, but always check local HOA rules if you live in a community with them.
How to Choose and Install Dummy Cameras Like a Pro
Choosing a dummy camera isn’t complicated, but a few details matter.
Look for realism. Compare side-by-side images with real camera models (check CNET or Tom’s Guide for current camera reviews and specs). The dummy should match proportions, have a realistic lens or dome, and include mounting hardware that matches real units. Cheap plastic bodies and obvious toy proportions defeat the purpose, they signal “fake” to anyone looking closely.
Check the LED. A slow blinking red or green light, visible day and night, adds credibility. Solar-powered models are cheaper to run long-term, but battery-powered ones are reliable if solar panels are likely to stay dusty. Test the light before mounting to ensure it works and lasts.
Verify weatherproofing. Even though it’s not recording anything, a dummy should withstand rain, UV exposure, and temperature swings if it’s outside. Look for models labeled IP65 or higher (indicating dust and water resistance). Cheap dummies that crack or fade in a season look even faker.
Material and finish. Most are plastic, which is fine. Darker finishes (black, dark gray) blend better and look more professional than shiny white models.
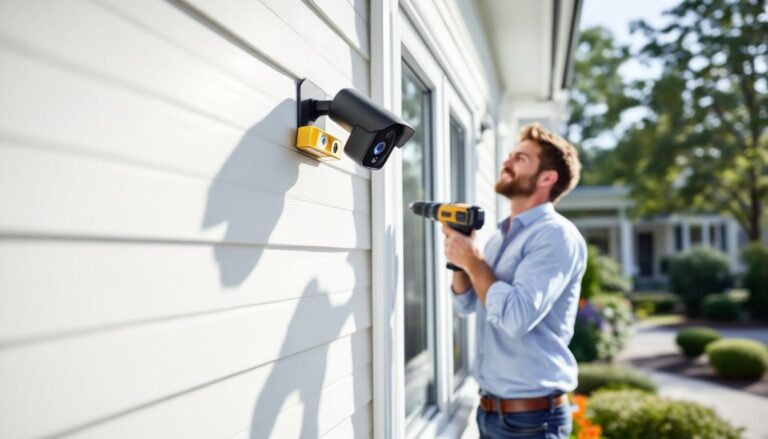
Installation Tips for Maximum Visibility
Placement is everything. A dummy camera hidden under an eave or pointed at the sky does nothing. Here’s how to position it for effect:
-
Mount at entry points. Place one at the front door (angled slightly downward to “see” approaching visitors), one at the back door, and one at side yard gates or openings. These are the routes burglars prefer.
-
Height matters. Mount cameras 7 to 9 feet high on exterior walls. This is the standard for real security systems, so it looks authentic. It also keeps the camera out of easy reach and away from destructive hands.
-
Angle for coverage appearance. Position the camera to “face” the most likely approach, usually the path from the street or driveway. Don’t mount it looking at a wall: orient it to suggest it’s surveying activity.
-
Use visible hardware. Mount with visible brackets, not concealed connectors. The more obviously “professional” the installation looks, the more credible the system appears.
-
Add a label or sign. Many dummy cameras come with small “System Armed” or “Surveillance Zone” stickers. Place one near the entry the camera covers. These reinforce the message without being an eyesore like large alarm company signs.
-
Tools needed: A drill with a 3/16-inch bit (for pilot holes in masonry or wood), 2-1/2 inch exterior-grade screws, a level, and a screwdriver. If you prefer non-invasive installation, adhesive strips work on smooth surfaces like vinyl siding, though they’re less permanent in severe weather. Most dummy cameras include small screws and anchors in the box.
Before you drill, check Good Housekeeping for tested home security recommendations and step-by-step guides to make sure your installation approach aligns with best practices for placement and visibility.
Dummy Cameras vs. Real Surveillance Systems: What’s Right for You
The honest answer: it depends on your risk level and budget.
Choose dummy cameras if:
• You live in a quiet neighborhood with low crime and want visible deterrence without expense.
• You’re renting and can’t install permanent systems.
• You want to add perimeter-level deterrence while investing in one or two real cameras in less obvious spots.
• You’re testing the concept before committing to a full system.
• You need quick, temporary coverage (e.g., during a vacation when a sign of activity is key).
Choose real cameras if:
• You live in a higher-crime area or have experienced break-ins.
• You need actual evidence for insurance claims or police investigation.
• You want 24/7 cloud or local recording.
• Your home has valuable items (tools, electronics, jewelry) you’d want to document if stolen.
• You’re willing to pay for monitoring services (professional or app-based).
A smart hybrid approach: Many homeowners use 2–3 real cameras at vulnerable spots (like blind spots around the house or back patio) paired with 4–5 dummy cameras at high-visibility entry points. Real cameras cost more but actually record: dummies are the first line of psychological deterrence. Together, they create the appearance of full coverage at a fraction of the cost of an all-real system, while still capturing footage if someone tries anyway.
One caveat: dummy cameras offer zero help if a crime does occur. Insurance companies won’t care that a camera looked real, they care whether you have actual video evidence. If your policy requires documented surveillance, you’ll need real cameras, not dummies.
Conclusion
Dummy security cameras are a legitimate, affordable deterrent for homeowners looking to discourage casual break-ins without major investment. They work best as one layer in a broader security strategy, combined with motion lights, locked doors, alarm signage, and one or two real cameras recording the spots thieves actually target. In 2026, as DIY security awareness grows, pairing visible fakes with selective real coverage is smart risk management on a realistic budget. Start with visible placement, maintain the illusion of full coverage, and know when to invest in real systems for high-risk areas.